PowerShell Script to Show Network Connections for Process

This PowerShell script displays a list of processes on your local PC that have network connections, allows the user to select one of those processes, and then it outputs the network connections used by that process:

#This Script shows the Network Connections that have been established by any given process name:

#Display a list of Process Names that have network connections:

#Distinct List of “OwningProcess” values from the Get-NetTCPConnection command:

$owningprocess = (Get-NetTCPConnection | Select-Object -Unique OwningProcess).OwningProcess

#List of names of those processes:

$ProcessList = Get-Process | Where-Object {$_.Id -in $owningprocess} | Select-Object Name, Path

#User has to select a process from the GUI that displays the list before code will continue:

$ProcessName = $ProcessList | Out-GridView -Title “Select a Process” -PassThru

#Now, show the list of Network Connections used by this Process:

Get-Process -Name $ProcessName.Name | ForEach-Object { Get-NetTCPConnection -OwningProcess $_.Id -ErrorAction SilentlyContinue }

PowerShell Command to Install Active Directory Users and Computers

To install Active Directory Users and Computers, Active Directory Sites and Services, Active Directory Domains and Trusts tools into Windows using PowerShell on Windows Server, run these two commands:
Import-Module ServerManager
Add-WindowsFeature RSAT-ADDS-Tools

When complete the tools should appear in the Start Menu under Windows Administrative Tools:

Permanently Unblock Files that came from Internet using PowerShell Unblock-File

In a previous post I mentioned how you could use the SysInternals streams utility to unblock files that were downloaded from the Internet.

Per that post: When you download a file from the Internet it gets tagged with an additional "NTFS Stream" of information — specifically with a Zone.Identifier record that tells Vista that the file came from the Internet.

If you look at the properties of the file, you see a message: "This file came from another computer and might be blocked to help protect this computer." and there’s an Unblock button you can push that is supposed to remove the Zone.Identifier.

If you had downloaded a .zip file from the Internet and then extracted it, all of the files extracted would all show as blocked.

One option is to use the streams utility. The other is to use this PowerShell command: Unblock-File

To quickly unblock every file in every sub-folder, use this PowerShell command:

Get-Childitem -Path ‘C:\PathToYourFolderHere\’ -Recurse | Unblock-File -Confirm:$false -Verbose

Microsoft Removes RemoteFX from Hyper-V Starting with Windows Server 2019 Build 1803

Microsoft has apparently discontinued support of RemoteFX in Remote Desktop Services starting with Windows Server 2019, Build 1803 and later.  Here’s the article:

https://docs.microsoft.com/en-us/windows-server/get-started/windows-server-1803-removed-features

That would be fine if there were an acceptable alternative available.  The problem is that there isn’t.  What Microsoft is calling an alternative: Discrete Device Assignment, has serious, show-stopper limitations that remove all high-availability features, live migrate, etc: https://docs.microsoft.com/en-us/windows-server/virtualization/hyper-v/plan/plan-for-deploying-devices-using-discrete-device-assignment

From that article:

Virtual Machine Limitations

Due to the nature of how Discrete Device Assignment is implemented, some features of a virtual machine are restricted while a device is attached. The following features are not available:

  • VM Save/Restore
  • Live migration of a VM
  • The use of dynamic memory
  • Adding the VM to a high availability (HA) cluster

PowerShell commands also depreciated

image

Further to this, starting with Build 1809 Microsoft also appears to have closed the back-door work around of using PowerShell commands to install the RemoteFX drivers.  Commands such as “Get-VMRemoteFXPhysicalVideoAdapter” no longer return any data.

NVidia Confirms

This NVidia article confirms (via a Footnote) that RemoteFX vGPU has been deprecated by Microsoft since Windows Server, version 1803.

https://docs.nvidia.com/grid/10.0/product-support-matrix/index.html

Bottom Line: RemoteFX is Gone, There is no Replacement for High-Availability RDP VMs

For my company, this means that GPUs such as the NVidia Tesla T4 GPUs will no longer accelerate VMs placed in Microsoft Hyper-V HA Clusters.

SQL Server 2019 RTM Cumulative Update (CU) 4 KB4548597 resulted in SQL Service unable to start

Early this morning Windows Updates updated one of our SQL 2019 servers with “SQL Server 2019 RTM Cumulative Update (CU) 4 KB4548597”.

That update resulted in the server being placed into a state whereby the SQL Server Service could not start. 

Event Viewer for System Showed every attempt at Starting the SQL Server service with the following error:

Event ID: 7024 “The SQL Server (MSSQLSERVER) service terminated with the following service-specific error:
WARNING: You have until SQL Server (MSSQLSERVER) to logoff. If you have not logged off at this time, your session will be disconnected, and any open files or devices you have open may lose data.”

Opening Windows Update, you could see that the update had been installed and that a server restart was required.

Restarting the server solved the issue and services came back up on their own.

Additional Information:
Windows Server 2016 Datacenter
The following Windows Updates were all installed at the same time:

Screen Capture of Windows Update History

2020-05 Cumulative Update for Windows Server 2016 for x64-based Systems (KB4556813)
SQL Server 2019 RTM Cumulative Update (CU) 4 KB4548597
Windows Malicious Software Removal Tool x64 – v5.82 (KB890830)
2020-04 Servicing Stack Update for Windows Server 2016 for x64-based Systems (KB4550994)

At this point I do not know if this issue is specific to this particular combination of KBs and Server 2016 or if other operating systems combinations will be affected. Will post updates if more systems are affected.

Improving Database Performance–Index Creation Recommendation

Because different customers use software in different ways, not every customer will benefit from exactly the same database-level indexes.

As a best practice, when users complain about database performance in a specific area of the application, or when performance tuning in general, I like to let the customer run with the application for a few days, and then use a query such as the one included below (adapted from Jeff Garbus at Soaring Eagle: https://mssqlperformance.blogspot.com):

–Source: Jeff Garbus from Soaring Eagle – Blog: https://mssqlperformance.blogspot.com/
–DRM – 2020-05-04 – Adapted by Darren to deal with mixed SQL Environments, include table name in index name, deal with table names containing spaces, etc.
–Use this SQL Script to identify indexes that if added could help improve performance.
–IMPORTANT: Do not BLINDLY implement the script recommendations.  For example, if the SAME TABLE is mentioned multiple times, then
–           it may be better to COMBINE the recommendations of multiple statements into a single one.
–           If you need help, Soaring Eagle. 
DECLARE @Edition varchar(50)
SET @Edition = CONVERT(varchar(50), SERVERPROPERTY(‘Edition’))
DECLARE @bEnterpriseEdition bit
IF (LEFT(@Edition, 9) = ‘Enterpris’ OR LEFT(@Edition, 9) = ‘Developer’)
SET @bEnterpriseEdition = 1

SELECT
      ‘CREATE INDEX IX_’
            + REPLACE(obj.Name, ‘ ‘, ”) +’_’
            + replace(replace(replace (equality_columns, ‘[‘, ”),’]’,”),’, ‘,’_’)
            + ‘ ON ‘
            + sch.name COLLATE SQL_Latin1_General_CP1_CI_AS + ‘.’ + QuoteName(obj.name)
            + ‘ (‘
            + equality_columns
             + CASE WHEN inequality_columns IS NULL
                   THEN ”
                   ELSE ‘,’ +  inequality_columns
               END
            + ‘)’
            + CASE WHEN included_columns IS NOT NULL
                   THEN ‘ INCLUDE (‘ + ISNULL(included_columns,”) + ‘) ‘
                   ELSE ”
               END
            + CASE WHEN @bEnterpriseEdition = 1
                   THEN ‘ WITH (online = ON)’
                    ELSE ”
              END
            + ‘ — ‘ + CONVERT (varchar, avg_user_impact) + ‘% anticipated impact’
      FROM sys.dm_db_missing_index_details mid
        JOIN sys.dm_db_missing_index_groups mig
            ON mid.index_handle = mig.index_handle
        JOIN sys.dm_db_missing_index_group_stats migs
             ON migs.group_handle = mig.index_group_handle
        JOIN sys.objects obj
            ON obj.object_id = mid.object_id
        JOIN sys.schemas sch
            ON obj.schema_id = sch.schema_id
      WHERE
        database_id = db_id()
        AND avg_user_impact > 60
        AND equality_columns IS NOT NULL
      ORDER BY
        obj.name
        , equality_columns
         , inequality_columns
        , included_columns

The output of this script should be reviewed carefully to see if the tables / recommendations make sense for the specific scenario.  Remember that there is a cost for implementing index changes that may outweigh the benefits.  The most common change that I make to the results from the above is to combine multiple recommendations for the same index into a single index with more elements in the INCLUDE() section.

For Blue Link employees reading this Blog, a version of the above is now available as IndexCreationRecommendationPROC().

How to determine SQL Server Version with SQL Server Year Name

One of the frustrations with SQL Server is that they do not expose the SQL Server Marketing Name that contains the year in the name as a Server Property.  Instead, to get that you either need your own lookup table, or you have to parse it from the @@Version string.

The following query returns every attribute that most people would want in discrete columns:

SELECT @@SERVERNAME as ServerName
, SUBSTRING(@@Version, 11, CHARINDEX(‘ (‘, @@VERSION, 1) – 11) as SQLVersionLabel
, SUBSTRING(@@Version, 22, CHARINDEX(‘ (‘, @@VERSION, 1) – 22) as SQLYearReleaseLabel
, SERVERPROPERTY(‘ProductLevel’) AS ProductLevel
, SERVERPROPERTY(‘ProductUpdateLevel’) AS ProductUpdateLevel
, SERVERPROPERTY(‘ProductBuildType’) AS ProductBuildType
, SERVERPROPERTY(‘ProductUpdateReference’) AS ProductUpdateReference
, SERVERPROPERTY(‘ProductVersion’) AS ProductVersion
, SERVERPROPERTY(‘ProductMajorVersion’) AS ProductMajorVersion
, SERVERPROPERTY(‘ProductMinorVersion’) AS ProductMinorVersion
, SERVERPROPERTY(‘ProductBuild’) AS ProductBuild

Combining a query like that with a product like Toad for SQL Server’s group execute feature, it becomes possible to pull the SQL Version info from an entire group of servers all at once.

Office 365 Version 1912 Build 12325.20288 Released 2020-01-08 64-bit Issue Linking SQL Tables with Identity True

Microsoft Access users may start experiencing #Deleted in all columns when adding new records to forms bound to SQL Server tables containing identity columns as of 64-bit Office 365 Version 1911 Build 12228.20364.

The issue occurs when linking SQL Server tables to a Microsoft Access database using the 64-bit version of Office 365 Version 1912 build 12325.20288 released on January 8th, 2020.

UPDATE: Office 365 Version 1912 build 12325.20298 released on January 14th, 2020 is ALSO affected by this issue.

UPDATE: 2020-01-17: Microsoft confirms the issue publicly: https://support.office.com/en-us/article/Fixes-or-workarounds-for-recent-issues-in-Access-54962069-14f4-4474-823a-ff7e5974a570

Direct Link: https://support.office.com/en-us/article/access-does-not-recognize-the-identity-column-in-a-linked-sql-server-table-ae418bbf-2658-453a-82f1-7e043812d60d

UPDATE: 2020-01-23: Microsoft Released Version 1912.12325.20344 that fixes the issue covered in this blog post. https://docs.microsoft.com/en-us/officeupdates/monthly-channel-2020#version-1912-january-22  From that URL “This update fixes an issue that can cause Microsoft Access to fail to identify an Identity Column in a linked SQL Server table, which can cause rows to be reported as deleted incorrectly”

The issue is as follows:

In SQL Server, assume you have a SQL Table with a column where the Identity property is true like this:

SQL Server Management Studio Table Designer – Showing (Is Identity) = Yes

When linked to Microsoft Access via an ODBC Link, that ID column normally appears in Microsoft Access as Data Type “AutoNumber”:

image
Microsoft Access Linked SQL Table Shows Identity Column Data Type as "AutoNumber"

When linked from Build 12325.20288, you can see that the same field now links as “Number” (Field Size: Long Integer), but it no longer recognizes the identity property from SQL Server:

Microsoft Access Linked SQL Table Shows Identity Column Data Type as "Number"
on Office 365 Build 12325.20288 64-bit

The effect of the Data Type being set incorrectly on the linked table is that an end-user after entering a new record in the Access Form bound to that table will see #Deleted in every field/column of the new record when they leave the record like this:

image

If the user forces a refresh of the data by using the SHIFT+F9 keyboard shortcut, the refreshed screen will display the new record since the record actually was committed to the database. It is worth noting that end users who do not realize this may panic since the #Deleted in every cell may appear to them as data loss.

Work Around:

Two different workarounds appear to work.

Work Around #1 – Change the bitness level back to 32-BIt by using the MigrateArch setting in the ODT:

If you have a business reason why you must run Version 1912 Build 12325.20288, switching from architecture from 64-bit back to 32-bit does seem to work as a workaround. However if you do not need to run that build a much better solution is simply to revert to the stable Dec 10, 2019 Version 1911 Build 12228.20364. To switch the architecture, download a current version of the ODT Setup, then use the following XML:

<Configuration>
< Add SourcePath="C:\odt" OfficeClientEdition="32" MigrateArch="TRUE" Channel="Monthly" >
< Product ID="O365ProPlusRetail">
< Language ID="en-us" />
< /Product>
< /Add>
< Updates Enabled="FALSE" />
< Display Level="Full" AcceptEULA="TRUE" />
< Logging Path="%temp%" />
< Property Name="SharedComputerLicensing" Value="1" />
< Property Name="AUTOACTIVATE" Value="1" />
< /Configuration>
Office ODT XML File Sample with "MigrateArch" Setting

Work Around #2 – Force Installation of Previous Build or the Fixed Version Build by specifying Version Explicitly in the ODT:

A better solution is simply to change to a version that does not contain the issue.

To force the installation of a particular build, first, use Control Panel Programs and Features to uninstall the existing Office 365 ProPlus build, then using the most recent ODT Installer download and then install the specific build using a config.xml file with the following contents:

OPTION 1: Revert to the last known good release of Office 365, which in my testing is Version 1911 Build 12228.20364.

<Configuration>
  <Add SourcePath="C:\odt" Version="16.0.12228.20364" OfficeClientEdition="64" Channel="Monthly" >
    <Product ID="O365ProPlusRetail">
      <Language ID="en-us" />
    </Product>
  </Add>
  <Updates Enabled="FALSE" TargetVersion="16.0.12228.20364" />
  <Display Level="Full" AcceptEULA="TRUE" />
  <Logging Path="%temp%" />
  <Property Name="SharedComputerLicensing" Value="1" />
  <Property Name="AUTOACTIVATE" Value="1" />
< /Configuration>
Office ODT XML File Sample to Install Specific Build 12228.20364

OPTION 2: Skip to the fix Version 1912 12325.20344

The complete list of versions /builds can be found here: https://docs.microsoft.com/en-us/officeupdates/update-history-office365-proplus-by-date?redirectSourcePath=%252fen-us%252farticle%252fae942449-1fca-4484-898b-a933ea23def7).

The sample below jumps you to Build 12325.20344 – the first build where this issue is fixed:  
 

<Configuration>
  <Add SourcePath="C:\odt" Version="16.0.12325.20344" OfficeClientEdition="64" Channel="Monthly" >
    <Product ID="O365ProPlusRetail">
      <Language ID="en-us" />
    </Product>
  </Add>
  <Updates Enabled="FALSE" TargetVersion="16.0.12325.20344" />
  <Display Level="Full" AcceptEULA="TRUE" />
  <Logging Path="%temp%" />
  <Property Name="SharedComputerLicensing" Value="1" />
  <Property Name="AUTOACTIVATE" Value="1" />
< /Configuration>
Office ODT XML File Sample to Install Specific Build 12325.20344

IMPORTANT: After you have changed the version of the ODT, you must RE-ATTACH the Linked Tables.  Those tables previously re-attached by the corrupted application are still linked as Number, not “AutoNumber” so you must RE-ATTACH the tables for the identity columns to be re-linked as AutoNumber once again by the database engine.

The following instructions are intended for customers of Blue Link who encounter this issue with Blue Link Elite:

<Configuration>
  <Add SourcePath="C:\odt" Version="16.0.12325.20344" OfficeClientEdition="64" Channel="Monthly" >
    <Product ID="O365ProPlusRetail">
      <Language ID="en-us" />
    </Product>
  </Add>
  <Updates Enabled="FALSE" TargetVersion="16.0.12325.20344" />
  <Display Level="Full" AcceptEULA="TRUE" />
  <Logging Path="%temp%" />
  <Property Name="SharedComputerLicensing" Value="1" />
  <Property Name="AUTOACTIVATE" Value="1" />
< /Configuration>

  • Run setup.exe /download Install20191210Build.xml from Administrative Command Prompt
  • Un-Install Microsoft Office 365 ProPlus using CONTROL PANEL “Uninstall a Program” option:

Control Panel > Programs > Programs and Features

When uninstall is complete, install with the new ODT XML:

  • From Administrative Command Prompt, run:
  • C:\ODT\Setup.exe /configure Install20191210Build.xml

When install is complete:

  • Open Access as Administrator  (this is so that the Blue Link Add-In can be registered correctly with the updated build of Access)
  • Do not open a database, instead, hit the escape key on your keyboard and then click File > Account and verify that the build installed is the correct build:

Microsoft Access File > Account Screen Showing Build 12228.20364

  • Finally, re-link the app to the SQL Database by re-selecting the data file from the Choose Company List:
    • Open "D:\BlueLink\Master\BLElite64.accde"
    • Click Choose Company
    • Select the company in question and click Use

To test: Open a sales order, add a new line, leave the row.  If no #Deleted, then the issue is solved.

Please comment and/or share this article with anyone else performing patch maintenance or managing a WSUS server / Office Updates.

Microsoft Access Error: Query ” is corrupt caused by KB4484127, KB4484119, KB4484113

As confirmed in this Microsoft Article: https://support.office.com/en-us/article/access-error-query-is-corrupt-fad205a5-9fd4-49f1-be83-f21636caedec

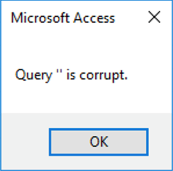
Microsoft Access application users may suddenly start to receive “Error Query ‘’ is corrupt”.

Microsoft released a security update as of November 12th, which can cause the following error in Microsoft Office and Blue Link applications:

query-corrupt

The following KB’s released by Microsoft, are known to cause the issue:

Solution:

Admins who manage WSUS servers should block the three KBs listed above to prevent additional end user machines or servers from receiving these updates.

If you already have these updates installed, and have admin rights to your computer, follow these steps to remove the updates:

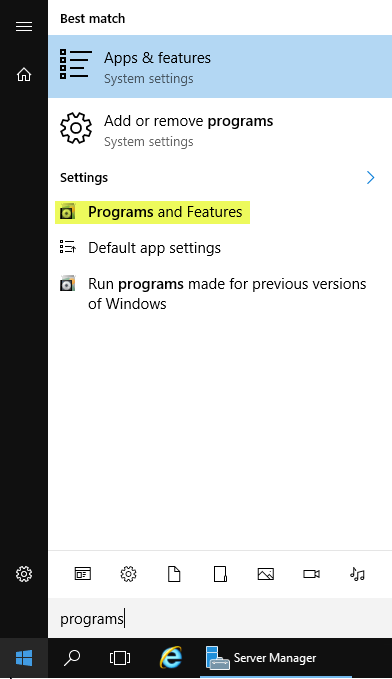
(1) Open Programs & Features

programs-features

(2) Click on view installed updates.

installed-updates

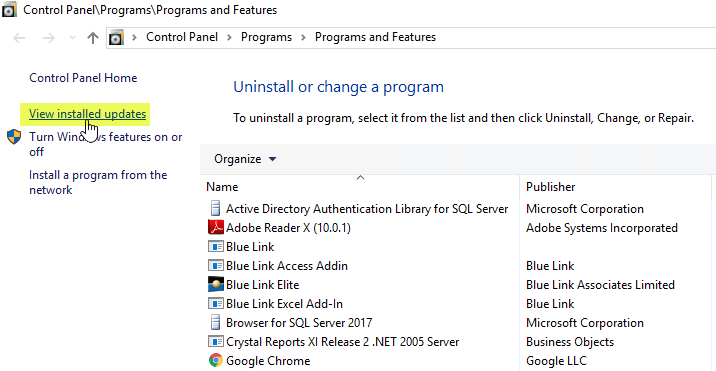
(3) Search for KB KB4484119 & KB4484113
(4) Once you find the update, click on Uninstall update. Please note, this may require a server reboot.

uninstall-update

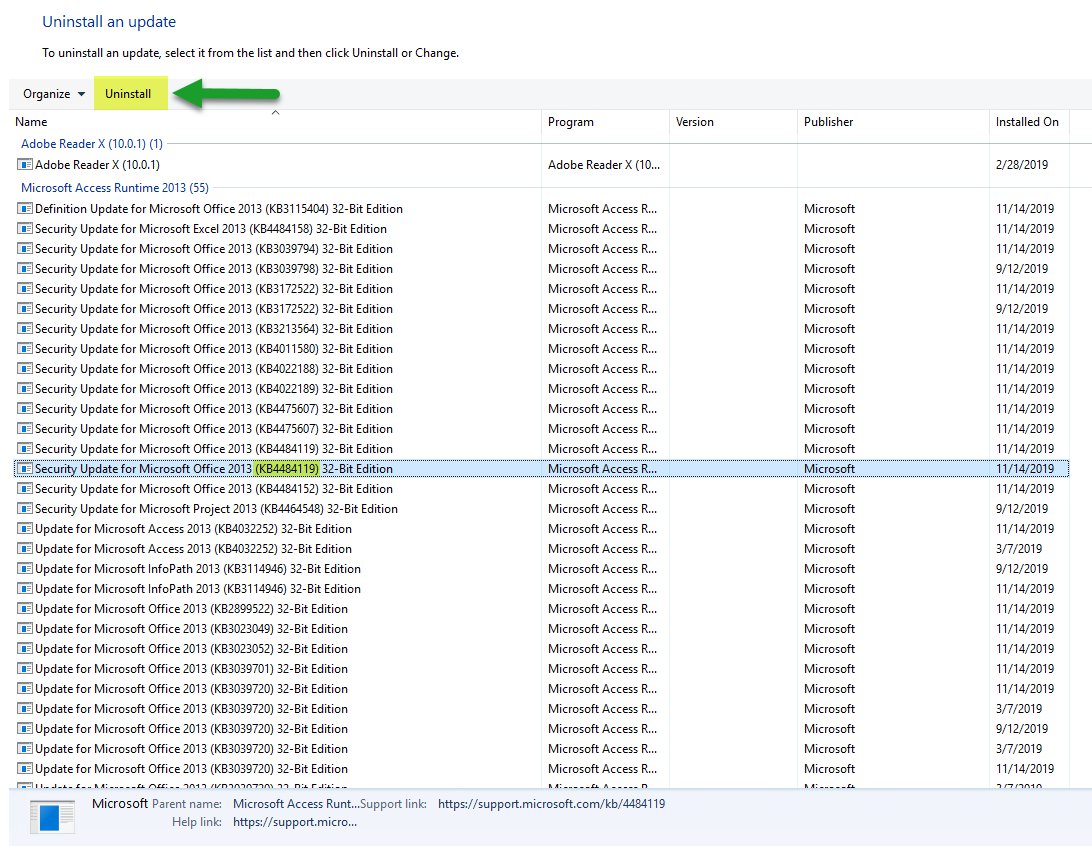
Tip: you can search the list:

image

  • Tip: To save time, since these KBs all start with “KB4484” searching for that will narrow the list, saving you time.

To Block the update on Windows 10 you now have to download a special tool since Microsoft removed the built-into-the-os version of the feature.

If running Windows 10, you’ll have to download the wushowhide.diagcab file from here:

https://support.microsoft.com/en-us/help/3183922/how-to-temporarily-prevent-a-windows-update-from-reinstalling-in-windo

image

Click Next, To Block the update if already un-installed, choose the hide option and then you’ll be presented with a list of updates that have NOT YET BEEN APPLIED to your machine.  If the KB is in this list, you may selected it and then click through the wizard.  This will prevent it from being auto-reapplied.  (NOTE: This step is not required if you use a WSUS Server and have already blocked the update there).

REMEMBER TO CHECK FOR PENDING UPDATES

image

Click Start, Type “Check for Update”

image

Look at the list of pending updates – if the server has already downloaded and partially installed the update it may show as shown in this screen capture.  If it does, the update is already partially installed – it is too late to block it.  You must force the server restart and then after the server comes back up, then un-install the update.

Update: 2019-11-17

For servers where the KB update was PENDING (showed in the Updates screen as about to be installed) if actual installation happened on Nov 17th or later it appears not to actually install that KB, but rather installs the updated KB:

https://support.microsoft.com/en-us/help/4484152/security-update-for-office-2013-november-12-2019

In such instance, there is no “un-install” step required.

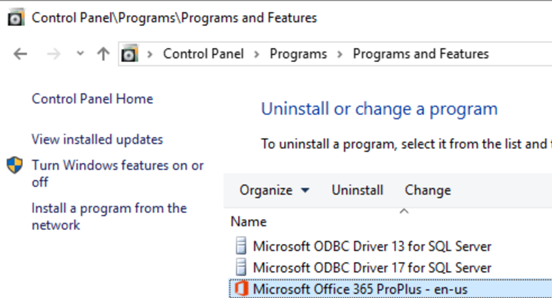
Access 365 (Office 365)

UPDATE: This issue is also affecting Access 365 (installed via Office 365 with Monthly Channel (Confirmed issue in Build 12130.20344 Click-to-Run).

Apparently, you can force the version of Office to a previous update by following these instructions:

https://support.microsoft.com/en-us/help/2770432/how-to-revert-to-an-earlier-version-of-office-2013-or-office-2016-clic

Here’s how to determine the “previous version” build numbers:

https://docs.microsoft.com/en-us/officeupdates/update-history-office365-proplus-by-date?redirectSourcePath=%252fen-us%252farticle%252fae942449-1fca-4484-898b-a933ea23def7

The previous build (October 30, 2019) is build: 12130.20272

2019-11-25 – UPDATE: Microsoft has released a patched version 12130.20410 – instructions below are designed to force you to the fixed version, instead of forcing you backwards to the prior version.

To update the app, the Office Deployment Tool (ODT) has to be used.  Assuming you extracted it to C:\ODT, then you would update the ODT XML as follows:

<Configuration>
     <Add SourcePath="C:\odt" OfficeClientEdition="64" Channel="Monthly" >
          <Product ID="O365ProPlusRetail">
               <Language ID="en-us" />
           </Product>
     </Add>                             
    <Updates Enabled="TRUE" TargetVersion="16.0.12130.20410" />
     <Display Level="Full" AcceptEULA="TRUE" />
     <Logging Path="%temp%" />
     <Property Name="SharedComputerLicensing" Value="1" />
     <Property Name="AUTOACTIVATE" Value="1" />
</Configuration>

If you have a C:\ODT\Office folder, delete it.

setup /download MyConfigFile.xml

setup /configure MyConfigFile.xml

For me this worked.  All I had to do was kick everyone off the server to allow the update to complete.  Minutes later the error was gone.

IMPORTANT: After the install completes click File, Account, Update Options then select Disable Updates to prevent the update from just being installed again:
image

For Access 2019 (Office 2019)

Same as Office 365, except the build numbers are different.  In my case, the affected build was Build 10352.20042 Click-to-Run. 

Here’s how to determine the “previous version” build numbers:

https://docs.microsoft.com/en-us/officeupdates/update-history-office-2019

Need to the October 8, 2019 build: 10351.20054

<Configuration>
  <Add OfficeClientEdition="64" Channel="PerpetualVL2019">
      <Product ID="ProPlus2019Volume"  PIDKEY="XXXXX-XXXXX-XXXXX-XXXXX-XXXXX" >
         <Language ID="en-us" />
      </Product>
  </Add>
  < RemoveMSI />
 
  <Updates Enabled="TRUE" TargetVersion="16.0.10351.20054" />
 
  <Display Level="None" AcceptEULA="TRUE" /> 
  <Property Name="AUTOACTIVATE" Value="1" />
</Configuration>

SQL Server 2016 SP2 (KB) Causes SQL Backups to Fail with error 3601

After applying SQL Server 2016 SP2 Backups of Databases that had SQL Change Tracking enabled at the time SP2 was applied to the server no longer work.  Backups will fail with this message:

image

TITLE: Microsoft SQL Server Management Studio
——————————

Backup failed for Server ‘ServerName’.  (Microsoft.SqlServer.SmoExtended)

For help, click: http://go.microsoft.com/fwlink?ProdName=Microsoft+SQL+Server&ProdVer=13.0.15700.28+((SSMS_Rel).160810-2135)&EvtSrc=Microsoft.SqlServer.Management.Smo.ExceptionTemplates.FailedOperationExceptionText&EvtID=Backup+Server&LinkId=20476

——————————
ADDITIONAL INFORMATION:

An exception occurred while executing a Transact-SQL statement or batch. (Microsoft.SqlServer.ConnectionInfo)

——————————

Failed to flush the commit table to disk in dbid 10 due to error 3601. Check the errorlog for more information. (Microsoft SQL Server, Error: 3999)

For help, click: http://go.microsoft.com/fwlink?ProdName=Microsoft%20SQL%20Server&ProdVer=13.00.5026&EvtSrc=MSSQLServer&EvtID=3999&LinkId=20476

——————————
BUTTONS: OK
——————————

My Scenario: Server OS: Windows Server 2016 Datacenter

SQL Server 2016 Standard, SP2 Applied

Databases affected are those that had SQL Change Tracking enabled at the time of SQL Server 2016 SP2 being applied to the server, like this:
image

Ola Hallengren Backup Scripts Also Fail

If you happen to be using the Ola Hallengren DatabaseBackup SPROC, you may also notice that SPROC start to fail with error

image

Msg 207, Level 16, State 1, Line 1 Invalid Column name ‘modified_extent_page_count’.

That failure is happening because there is no column ‘modified_extent_page_count’ in the DatabaseName.sys.dm_db_file_space_usage views after the application of SQL 2016 SP2.

This is the specific line from the DatabaseBackup SPROC that fails:

SET @CurrentCommand07 = ‘SELECT @ParamAllocatedExtentPageCount = SUM(allocated_extent_page_count), @ParamModifiedExtentPageCount = SUM(modified_extent_page_count) FROM ‘ + QUOTENAME(@CurrentDatabaseName) + ‘.sys.dm_db_file_space_usage’

Solution: Remove SP2:Click Start, type “Update” and then choose “View Installed Updates”:

image

Scroll down to “Microsoft SQL Server 2016 (64-Bit)

image

Select “Service Pack 2 for SQL Server 2016 (KB4052908) (64-bit) 

Click Uninstall

image

If as in my case a restart is required, the setup will tell you that.  Restart the server then repeat this process and you’ll be able to click through the wizard to the end.

When the service pack removal is complete, backups will work once again.

Disabling change tracking does not solve this problem only uninstall of SP2 worked for me

I’m adding the steps to disable change tracking here for your easy reference, but in my experience this DOES NOT actually solve the problem.  Using a script like this you can disable change tracking:

SELECT ‘ALTER TABLE dbo.’ + QuoteName(t.name) + ‘ DISABLE CHANGE_TRACKING’ as tSQLToRun
FROM sys.change_tracking_tables ctt
JOIN sys.tables t
    ON t.object_id = ctt.object_id
JOIN sys.schemas s
    ON s.schema_id = t.schema_id
ORDER BY s.name, t.name

–Copy the results of the script above to a new query window and execute to turn SQL Change Tracking off on the tables for which it was enabled, and then run a command like this to disable change tracking on the database.

ALTER DATABASE DatabaseName SET CHANGE_TRACKING = OFF